Hardware mix down processes & Final thoughts

I used a few different pieces of hardware gear to I used a few different pieces of hardware gear to give each track a slight mix down. My DAW track being dnb needed to be quite extensively mixed if it was to compare to other songs in the genre when being mixed together in clubs. The Studio session track was less mix dependant as it’s more of an experimental track than a dance floor one. The mix processing on this track was to add depth to it and glue some elements together

I used the analog heat on both mixes. This unit I used the analog heat on both mixes. This unit has 8 different distortion units with a high and low shelf filter with a variable filter too. I used this on the bass of the DAW track to add some more harmonics to it. I used it similarly on the drum bus for both tracks in parallel to glue the drums together and add some more mid presence.

I used the lexicon reverb also in both tracks, this is a multi-fx reverb that offers other fx such as delay, pitch shift and chorus that can be used 2 at a time. Many of the tracks needed this on the studio track to add more life to the track. I also sent the drums through it with made them sound a lot larger. on the DAW track, I only used this reverb on the synth bus as another method to glue this bus together instead of distorting like the bass tracks.

I used the 1176 on the bass of the studio track too. I I used the 1176 on the bass of the studio track too. I used the 1176 on the bass of the studio track too. This was used to even out the frequencies it also added to the bumpy movement of it in parts on the track. The 1176 adds warmth to the bass also, this compressor can be used as a pre-amp in some cases due to its unique sound.

Overall, I am happy with the 2 compositions that I have made for this hardware module considering this was the first time going this in-depth with hardware synths. Both have contrasting styles, both in genre and in style of production. If I were to further work on these tracks, I would have focused on the mixdown of the DAW track to bring it more up to standard.For the studio session, I would try to add more transitional effects and soundscapes so there’s more depth and doesn’t change suddenly.
Studio session setup & DAW Composition sound selection

For my studio session composition, I decided on multiple synths to use and started by recording short drum loops & musical phrases taking inspiration from the Saytek video, but instead of using the session view I chose arrangement view as I was making a song compared to a live set. once I had a good amount of loops I started to extend the loop and arrange the tracks as I added sounds. I carried this process on, adding/ editing tracks until I felt I had a full track.

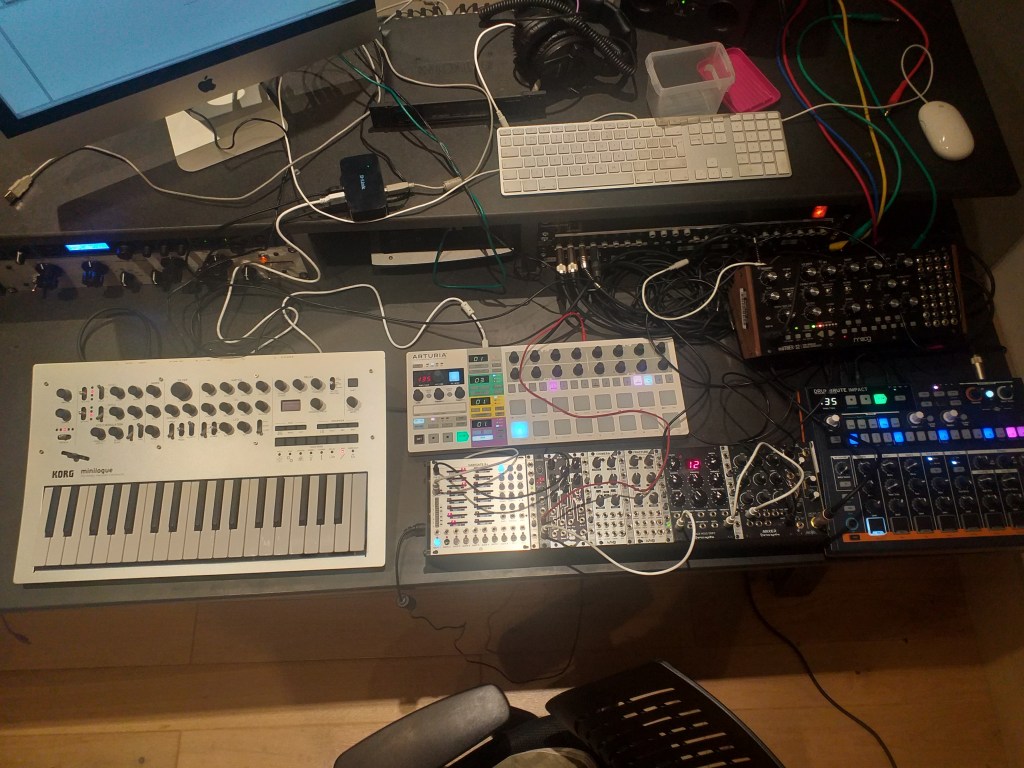
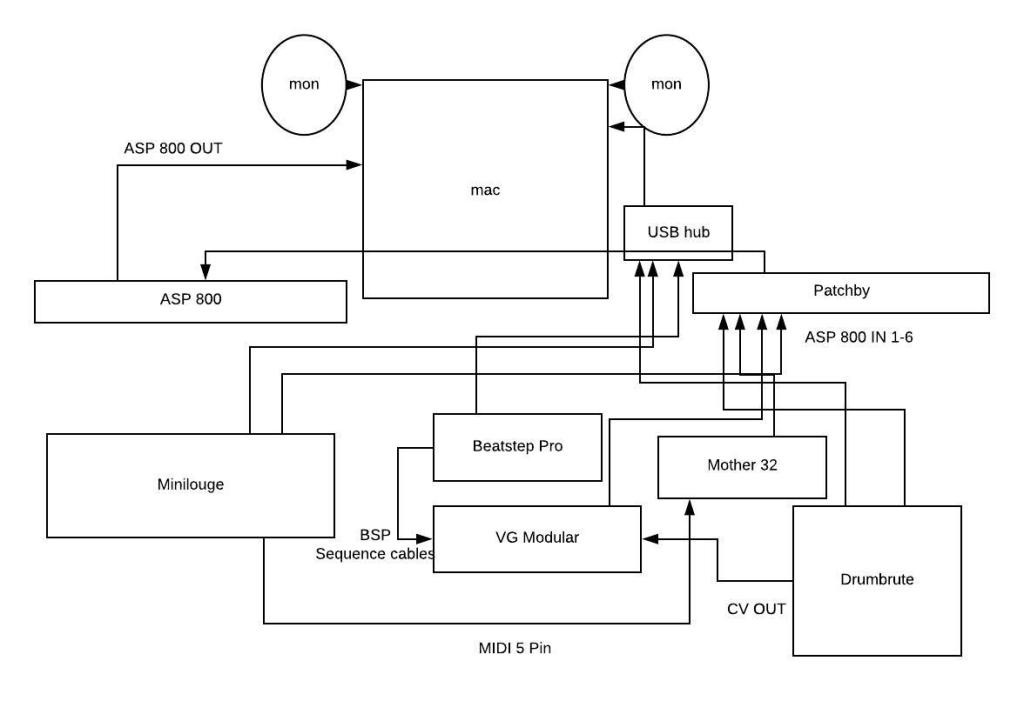
This picture shows the setup I used and a diagram of the basic connectivity I used, this changed throughout the session when I wanted to control or modulate a synth in a different way:

left – right: Minilouge, Beatstep Pro, Varigate Modular, Moog Mother32 & Drumbrute

With this setup, I could sync all synths to Ableton’s clock so that the patterns will start from their initial point. The CV out sent a constant tick to the modular which could trigger any one of the sound modules, as well as the beat step pro being able to send out 8 drum gate patterns. The Korg is sending MIDI information to the Moog and works similar to a MIDI controller, as it is also synced to Ableton, I could write a pattern before recording then modulate the Moog whilst it’s recording to add movement to the bass.

With this setup, I could easily create new ideas on the fly whenever I felt something new was needed just by adding a new track and routing it to record the right channel. I really enjoyed this way of working as all sounds being generated were external and I could quickly add parts to the track without any re wiring.

DAW sound source collecting

For my DAW project, I used many of the same synths, but instead of creating the song in the session, I dedicated the studio sessions to collecting sounds which I could then further edit and manipulate when I was writing the song.

Take the drums for example. For the main Kick & Snare, I used the rhythm wolf, but I then layered them with sounds I had generated from the VG Modular in a later session to create fuller drums. This kind of process is quite common in Drum & bass as it gives the drums more punch which is essential in the genre.

A different method I also used was to take the source sounds and further process them. In my session with the mother 32, I created a lot of dub-like LFO sirens. When I exported these into the DAW, I managed to make a range of sounds from percussion to riser style FX. I also did this with some of the sounds I collected from the Korg to create a richer soundscape.

This way of working takes more time compared to the studio session track, but I feel the extra time and processing does result in a better sounding track.

Korg Minilouge

The Korg monologue is a dual oscillator, polyphonic synth with an added noise oscillator. It is part digital part analog giving it a rich sound with digital performance modes and also makes it MIDI USB compatible, this means you can use the synth as a controller or send MIDI from the DAW to the Korg

The variable VCF on the Korg can be modulated by either the LFO or separate filter ADSR

I found this synth great for a multitude of different sounds from synth keys and strings, arps and basses. The arp, chord & unison modes make it easy to create fuller sounds from the get-go

I used this synth to create all the bass sounds for my DAW composition, as well as some of the atmospheric background sounds as well. I found these easy to generate using some of the presets as the basis then modulating them further using the cross depth modulation and the delay to create more drone style patches

In my studio session track. I synced the Korg up to Ableton so that I could program notes in instead of worrying about notes being in time. This was how I made most of the musical elements for this track. I also used the MIDI out to control the pattern for the Moog mother. This video shows the setup explained above:

This also shows the modular being patched through the Moog’s external audio & mixed in the noise mixer

Rhythm Wolf & Drum brute comparison

For my live format composition, I plan to use a drum pattern machine. This will act as the backbone of the track, creating the basic kick-snare for this track along with some hats and percussion that’s included on my chosen synth. I will also use the drum machine as a CV clock to sync any modular equipment that can’t be connected via USB.

The main requirements for the drum machine are: that the source sounds are clear and punchy; the pattern creator is easy to use that has banks available to store multiple patterns; it’s possible to create arrangements using the synth and the drum machine has some way to add variety to the usually static drums.

Rhythm Wolf: This was the first of the drum machines I tried, I found the patterns relatively easy to create and it was easy to add multiple patterns to the bank which could be saved. Despite this, I found the drum sounds were too weak and I didn’t like the sound of them.

Drum brute: When using this drum machine, I found the sequencer pretty similar to the Rhythm wolf. The addition of the loop repeat function made creating buildups and it’s also possible to create patterns twice as long which can make the drums less repetitive. The source sounds from the drum brute are a lot punchier also and with the accent button, it’s possible to make an even more varied pattern.

This video shows these drum machine’s sounds in comparison and backs up my statement about the RW drums lacking punch

Varigate Euro-rack sequencer

In some of the sessions in lecture I have been using the variegate euro-rack modular synth. This euro-rack contains a sequencer which will let you set up 8 separate gate signals and 2 CV signals, these gate signals can be sequenced using the probability fades when you have the certain gate selected. This trigger can be sent to one of the four sound sources in this rack (Chimera, Drum Sampler, Manis Iteritas and WMD Fracture)

I found this modular great to experiment with and create unique sounds by patching in multiple effects.

The black hole reverb & crush unit was great for creating more atmospheric sounds and also running samples through, using it solely as an fx module
Both the fracture and chimera modules create some nice granular effects that I will be using in my sound design sessions

although there is a sequencer on this euro-rack, when paired with the beat-step pro, it is easy to create drum patterns quickly. I will be using these in my live studio situation.

I also found that using the patch bay on the mother 32 to further modulate parts of the euro-rack effects, or the modular sound can be patched into the external audio of the Moog which could then be blended in via the noise mixer.

I used it in multiple different ways for both my songs to try to make a lot of unique sounds. The videos below show some different modular setups I have used for my studio session composition:

This shows the drumbrute being used to serve as a clock for the modular so that it stays in time with any patterns made on the drumbrute
this shows the drumbrute sending signal to the drum sampler on the modular, the crush parameter is also being modulated by the LFO from the Moog. The LFO can also self oscillate which can create some interesting sounds

Moog Mother 32 Semi-Modular

In my first studio session, I used the Moog mother 32 as I wanted to use a synth that could produce a wide range of sounds whilst implementing some modular patching.

The Moog at its core is a single waveform synth that can be set to either sawtooth or pulse width mode. It also contains a noise oscillator that can also have external audio patched in via the patch bay, the patch bay also makes it possible to modulate one of the select waveforms with another. This makes it possible to create rich bass and lead tones.

The VCF in the Moog is fixed at 24dB/ octave, this can be controlled by the envelope or LFO. The LFO can be switched between square or triangle mode. This LFO can also be used as an oscillator when ran at a high enough rate. I found this useful to create some dub like-sounding FX by running the LFO at a fast rate with high resonance. The resonance on this filter has a classic ‘Moog’ sound which can make some great acid style patterns when set relatively high.

In my first session with this synth I recorded a quick live jam using this paired with the Rhythm wolf, I also took some drum samples and fx to use in my productions:

although quite rough, this give a brief idea of both synths working together in unison

I found that the Moog was great for creating multiple different sounds from Reese basses to more tonal arpeggiators which I plan to use throughout my DAW-based project. I found the sequencer quite complicated to use with such a small keyboard, due to this I will probably use a sequencer like the beat step pro to create patterns for my live set

Relevant links I used when experimenting with this synth can be found below:

https://www.soundonsound.com/reviews/moog-mother-32

https://www.youtube.com/watch?v=-vS2doNLp1M&t=1003s

https://api.moogmusic.com/sites/default/files/2018-01/Mother_32_Manual.pdf

MIDI Clocks & connectivity

Most hardware synths can be connected together via MIDI (musical instrument digital interface) with using the midi in, out and thru. To make sure that all of the hard synths are able to sync to a BPM, all of the synths must follow a common clock. This clock can be set via one of the clocks in the synths or by a computer running as a master to sync the BPM.

MIDI can also be used via USB port in some cases, this makes it possible to send MIDI information from the DAW over to a synth to trigger certain notes. This will come in useful for me when I am composing my live track as I will have to worry less about my performance of keyboard playing and can set up MIDI patterns prior to my recording.

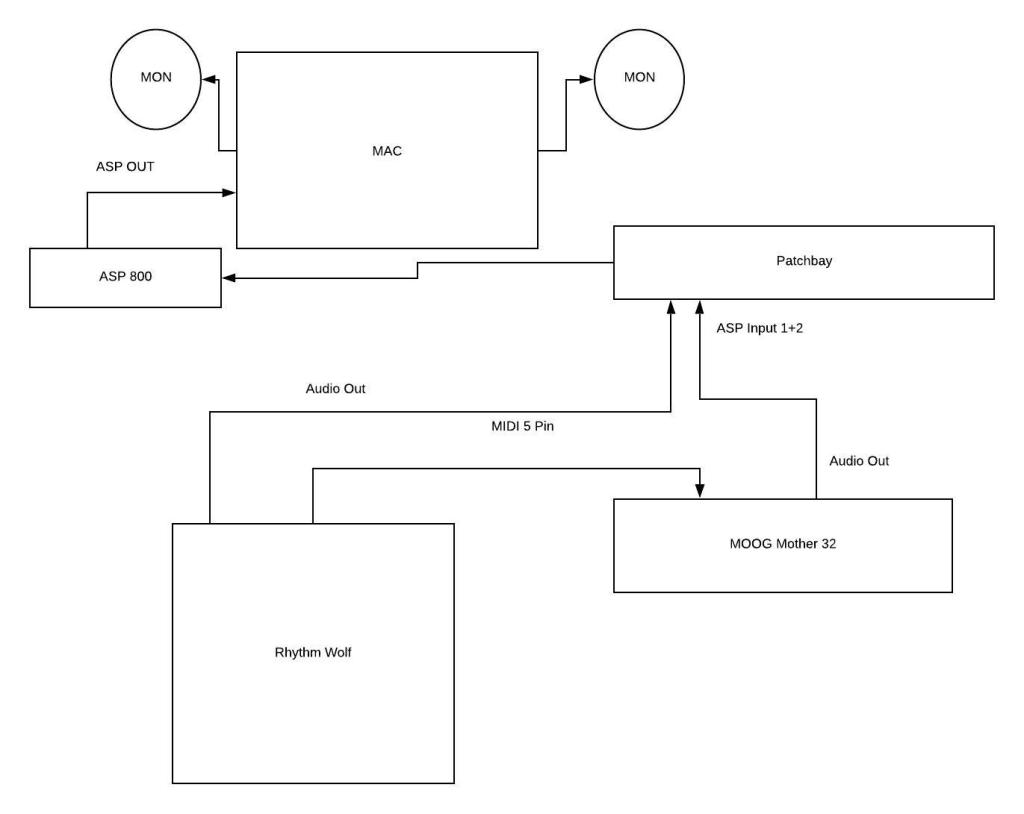
Below I have made an example diagram of 2 pieces of hardware and their connectivity which I plan to use as the bases of my track:

This diagram shows the 5 pin MIDI is connected to the Moog mother, this sends it a pulse so that the sequence on the Moog will stay in sync.

Initial Ideas

For this module, I will have to create 2 contrasting For this module, I will have to create 2 contrasting compositions, using mainly hardware and MIDI sequencers as the tools for composition.

For one of my compositions, I plan to use a range of synths in more sound design format then re sampling this to create a drum & bass track.

This approach for a drum & bass track is quite uncommon in the modern-day but hardware is still used in modern DNB to create rich bass sounds and unique effects, hardware processes are also commonplace. Early jungle + DNB would’ve also relied a lot heavier on hardware equipment as DAWs didn’t have the power they do today, as Roni Size explains in this interview: https://www.soundonsound.com/people/roni-size-creating-new-forms-2

My second composition will be more focused on creating a track within a session using the DAW mainly as a recorder and to send off MIDI sequences. I have not yet decided on a genre for this as it will depend on the vibe in the studio that day. For this composition, I will have to make sure I know the equipment well and the connectivity is good before starting the track

Live setup examples:

These setups show how a composition can be made using hardware and MIDI, they are a lot more These setups show how a composition can be made using hardware and MIDI, they are a lot more complex than what I’m planning for my project but that is due to them being setups for live sets as opposed to a 3-4 minute composition

Design a site like this with WordPress.com
Get started